
12 July 2026
Fixing Expensify: SmartScan PDF Receipts and Mapping GL Codes to Sage Intacct
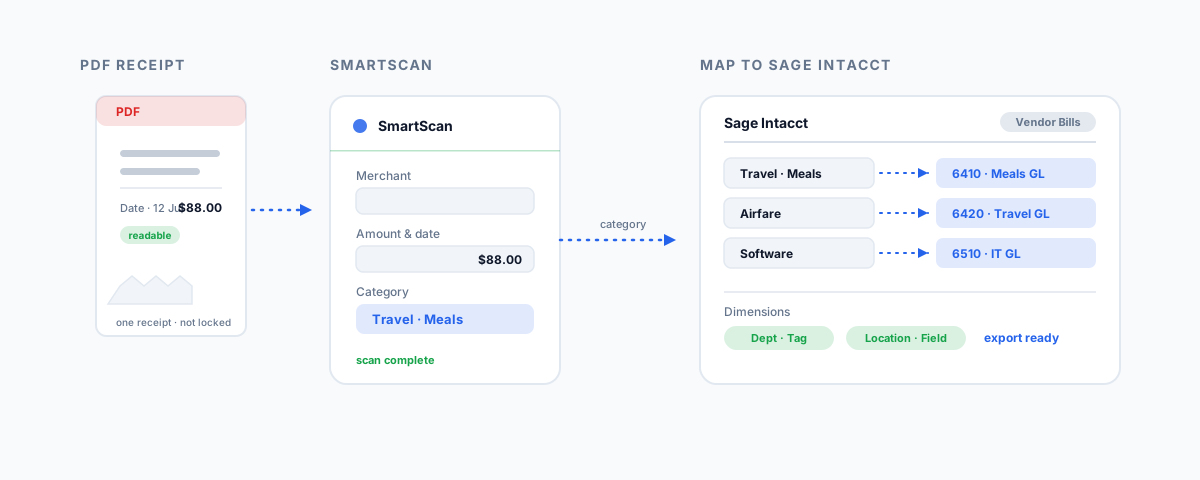
Two practical Expensify fixes — why SmartScan fails to read PDF receipts and how to solve it, and how to map Expensify categories to Sage Intacct GL codes and dimensions so expenses export cleanly.
Two Expensify problems reliably stall a finance team at month-end. The first is SmartScan quietly refusing to read a PDF receipt — the file uploads, nothing happens, and someone ends up typing it in by hand. The second is coding: getting Expensify categories to land on the right Sage Intacct GL accounts so the export goes through instead of erroring. Both are fixable once you understand what is actually happening underneath. This walks through each — why it breaks, and how to set it up so it does not.
Part 1: Why SmartScan Fails on PDF Receipts
SmartScan does support PDFs — alongside JPG and PNG — so a PDF is not the problem in itself. What SmartScan needs is a clear, readable image with, critically, a legible date and total amount. If it cannot confidently find both of those, the scan fails and the expense is left for you to complete. PDFs trip this up more often than photos for a handful of specific reasons, and knowing which one you have hit tells you the fix.
| Why the PDF fails | The fix |
|---|---|
| The PDF holds several separate receipts | SmartScan reads one receipt per file — split them, or attach the PDF to separate expenses and enter each manually |
| A single receipt spans multiple pages | Combine those pages into one PDF so the whole receipt is one file |
| No clear date or total (faint, cropped, low-res scan) | Re-scan at higher quality with the date and amount clearly visible, or enter those fields by hand |
| The file (or a batch) is too large | Uploads over the size limit time out — compress the PDF or upload fewer at once |
| It was emailed from an unverified address | Only forward receipts to receipts@expensify.com from an email address verified on your Expensify account |
| Email-signature logos got scanned instead | Forwarding a receipt with an image-heavy signature can confuse the OCR — send the receipt on its own, or upload the file directly |
The pattern behind almost all of these is the same: SmartScan is looking for one clean receipt with a visible date and total. Anything that obscures that — multiple receipts in one file, a low-quality scan, a giant file, or stray images — is what makes it fail.
Fixing It in Practice
When a PDF will not scan, work through it in this order. Confirm the file is a single receipt on a single logical document; if it is a supplier-generated PDF with several invoices, split it. Check the date and total are actually legible — open the PDF and read them yourself; if you struggle, so will the OCR. Make sure you are sending from a verified email if you forward to receipts@expensify.com, and send the receipt without a heavy signature. If the file is large, compress it before uploading.
And know when to stop fighting it. SmartScan is a time-saver, not a guarantee — if a particular receipt genuinely will not read, the fastest fix is to open the expense and fill in the merchant, date, and amount manually, keeping the PDF attached as the proof. That is a perfectly valid outcome, not a failure; the goal is a correct, documented expense, however it gets there. If SmartScan is failing often enough that this is a daily annoyance rather than an occasional one, it may be worth weighing up whether Expensify is still the right tool — we cover the options in our rundown of cheaper alternatives to Expensify.
Part 2: Mapping Expensify GL Codes to Sage Intacct
The second problem is coding expenses so they export cleanly into Sage Intacct. The connection itself is straightforward to set up; the part that catches people is understanding how Expensify's categories relate to Sage Intacct's GL codes, because it is not fixed — it depends on how you export.
The one thing to understand first is that in Expensify, categories are the mechanism that maps an expense to a Sage Intacct account, and every expense must have a category to export at all. But what a category actually represents on the Sage Intacct side changes with your reimbursable export type:
| Expensify export type | What categories map to in Sage Intacct |
|---|---|
| Vendor Bills | Your Chart of Accounts — i.e. GL codes directly |
| Expense Reports | Sage Intacct Expense Types (which sit against GL accounts in Intacct) |
| Journal Entries | GL accounts, posted as a journal |
This is the crux of "mapping GL codes." If you want Expensify categories to correspond directly to Sage Intacct GL account codes, you generally export as Vendor Bills (or Journal Entries), where the category is the GL code. If you export as Expense Reports, your categories map to Intacct Expense Types instead, and it is those expense types — configured in Sage Intacct — that carry the GL account. Neither is wrong; you just need to know which model you are in so you map to the right list.
The Mapping, Step by Step
The Sage Intacct connection is configured in Expensify Classic. In broad strokes, the order that works is:
- Connect Expensify to Sage Intacct first, so Expensify can import your Sage Intacct configuration — your chart of accounts, expense types, and dimensions.
- Choose your reimbursable export type (Vendor Bills, Expense Reports, or Journal Entries) on the export settings, because that decision determines what your categories represent, per the table above. Set this before you map, not after.
- Map your categories to the imported Sage Intacct list — GL accounts if you are exporting Vendor Bills, expense types if you are exporting Expense Reports. Give every category you use a destination.
- Configure your dimensions on the Coding tab — Sage Intacct's departments, locations, classes, projects, and any user-defined dimensions.
Handling Dimensions: Tags Versus Report Fields
Sage Intacct dimensions are how you split spend by department, location, class, or project, and Expensify brings them in as either Tags or Report Fields — a choice that matters. Import a dimension as a Tag when the value can differ from one expense to the next, which is what you want when staff cross-charge across departments or locations within a single report. Import it as a Report Field when a single value applies to the whole report. For user-defined dimensions, you enable them on the Coding tab, enter the integration name, and pick Tag or Report Field for each. Getting this split right is what lets your Sage Intacct reporting slice expenses the way your finance team actually needs.
Common Mapping Gotchas
A few recurring issues cause most failed exports, and all are quick to check:
- An unmapped or missing category. Every expense must have a category, and every category you use needs a Sage Intacct destination. An expense with no category, or a category you never mapped, will block the export.
- Exporting to the wrong list. If your categories were built as GL codes but you are exporting as Expense Reports (which expects expense types), the mapping will not line up. Match the export type to how your categories are structured.
- An inactive or renamed GL account. If a GL account or expense type is deactivated or renamed in Sage Intacct after you mapped it, the export can fail — re-import and re-map when your chart of accounts changes.
- A required dimension left blank. If Sage Intacct requires a dimension (say, a department) and the expense has no value for it, Intacct will reject it. Make required dimensions mandatory in Expensify too, so they are captured up front.
Getting Help
Neither of these is hard once you know the mechanics — SmartScan wants one clean receipt with a readable date and total, and Sage Intacct wants every expense in a mapped category that matches your export type. Where it gets fiddly is in the details: the export-type decision, the dimension mapping, and keeping the two systems in step as your chart of accounts changes. If you would like the Expensify–Sage Intacct connection set up properly, mapped to your actual chart of accounts and dimensions, and documented so it keeps working, our Workflow Automation service handles exactly this kind of integration — so expenses flow from a photo on someone's phone to the right GL code in Sage Intacct without anyone re-keying them.