
15 July 2026
QuickBooks Rebuild Error Code 310 — and How to Restore a QuickBooks Online Backup
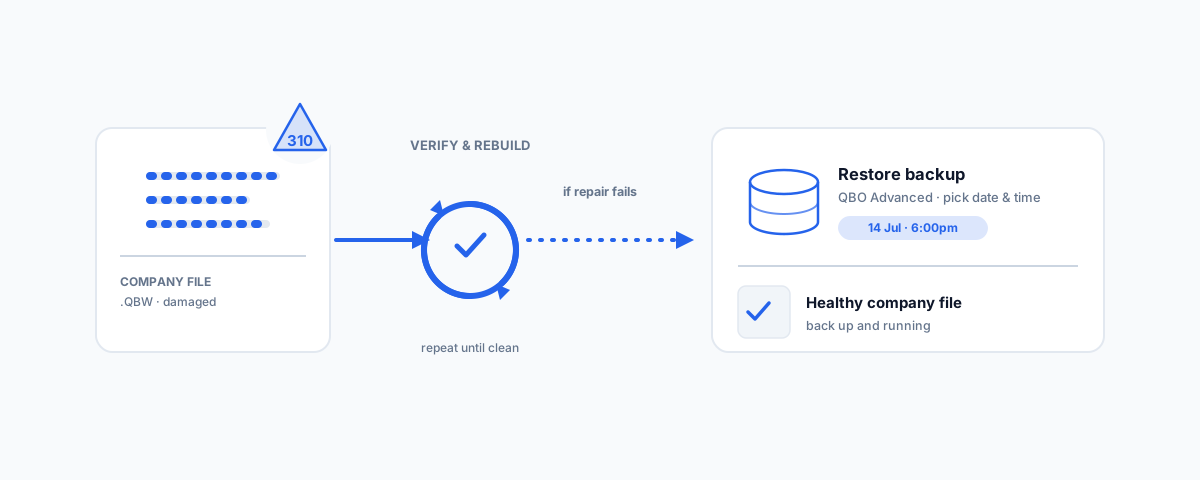
QuickBooks Rebuild Error Code 310 signals damaged company-file data in QuickBooks Desktop and can even block your backups. Here is what the error means, how to fix it with the Tool Hub and the verify-and-rebuild loop, and — when repair fails — how to restore a QuickBooks Online backup.
Few things unsettle a business owner like their accounting file throwing an error. QuickBooks Rebuild Error Code 310 is a particularly worrying one, because it appears during the very tool that is meant to repair your data — and it often blocks you from taking a backup at the same time, which can feel like being locked out of your own books. The good news is that 310 is usually fixable, and where it is not, a clean backup will get you running again. This guide explains what the error means, how to work through the fix, and — when repair is not enough — how to restore a QuickBooks Online backup.
First, Two Different Errors Called 310
Before you start, it is worth clearing up a common confusion, because the search results for "QuickBooks error 310" mix two unrelated problems:
- Rebuild Error Code 310 appears in QuickBooks Desktop when you run the Rebuild Data utility. It points to damage inside your company file, and it frequently also stops a backup from completing. This is the error this guide is about.
- Error 310 on its own often refers to a QuickBooks Online bank-feed problem, where your bank blocks the connection until you re-enter your login details. That is a banking credentials issue, not a data-damage one, and the fix is simply to update your bank sign-in from the banking screen.
If your 310 showed up while rebuilding a company file, you are in the right place.
What Rebuild Error 310 Actually Means
QuickBooks Desktop includes two data tools: Verify Data, which scans your company file for problems, and Rebuild Data, which attempts to repair them. Rebuild Error 310 is the rebuild reporting that it hit a structural problem it could not cleanly resolve — a damaged transaction, list entry, or index inside the file. Because QuickBooks tries to protect you by taking a backup before it rebuilds, a file damaged enough to throw 310 can also fail that backup step, which is why so many people meet this error and the message "cannot back up" together. It is a signal that the file needs proper repair, not that your data is necessarily lost.
How to Fix Rebuild Error 310 in QuickBooks Desktop
Work through these in order, and stop as soon as a clean verify confirms the file is healthy:
- Update and note the details first. Update QuickBooks Desktop to the latest release, and write down the exact error text. Precise codes matter if you end up needing support.
- Run the QuickBooks Tool Hub. Download Intuit's free QuickBooks Tool Hub, open Company File Issues, and run Quick Fix my File, then Rebuild your file. The Tool Hub can often complete a rebuild that the in-product tool cannot.
- Do the verify-and-rebuild loop. In QuickBooks, go to File → Utilities → Rebuild Data, let it finish, then run File → Utilities → Verify Data. If Verify still finds problems, rebuild again. Repeat until Verify reports no issues — one pass is often not enough.
- Re-sort your lists. Corrupt list order is a common cause. Re-sorting master lists (such as the Chart of Accounts and the Item list) clears a surprising number of rebuild errors.
- Read the log to find the culprit. The verify results and the
qbwin.logfile name the specific damaged transaction or list entry. Finding it, then deleting and re-entering that one record, often lets the rebuild finish. - Try Auto Data Recovery. If the file will not repair, QuickBooks Auto Data Recovery (ADR) can rebuild a near-current copy from its own recovery files.
- Escalate if needed. When none of the above clears it, Intuit's paid data-recovery service or a QuickBooks ProAdvisor can often recover a file that the free tools cannot. Our guide to fixing a QuickBooks unrecoverable error walks through the broader Tool Hub workflow these steps sit inside.
When to Stop Rebuilding and Restore Instead
Rebuilding has a point of diminishing returns. If you have run the loop several times and Verify keeps finding the same damage, or the rebuild simply will not complete, the faster and safer path is to restore from a known-good backup and re-enter only the transactions since that backup was taken. Chasing a rebuild for hours often costs more than the day or two of data you would re-key from a recent copy. That, of course, assumes you have a backup — which is where the second half of this guide matters.
How to Restore a QuickBooks Online Backup
If your business runs on QuickBooks Online, the built-in restore feature is part of the Online Backup and Restore tool, and there is an important limit: it is included only with QuickBooks Online Advanced. On Advanced, restoring is straightforward:
- Select the Settings (gear) menu, then Back up company.
- Open the Restore tab and choose Create restore (or New restore).
- Pick the company, then the date and time you want to roll back to.
- Read the on-screen warnings, confirm, and let it run. Do not use the company while the restore is in progress — when it finishes, the status shows a checkmark and you can work again.
A few things to know before you restore: backups older than about a year are generally no longer retrievable, and a small amount of data is handled differently — inventory history and adjustments are not included, budgets need to be exported separately as a CSV, and tax rates tied to expense accounts are restored into liability accounts. Restore rolls the whole company back to the chosen point, so anything entered after that time is undone.
If You Are Not on QuickBooks Online Advanced
This is the part that catches people out: Simple Start, Essentials, and Plus have no native backup-and-restore. There is no button to roll your company back to yesterday. If you are on one of these plans, your options after data loss are limited to reviewing the Audit Log and manually re-entering changes — unless you set up protection in advance. A third-party backup app such as Rewind or SaasAnt continuously backs up your QBO data and lets you restore it, but only if it was connected before the problem happened. The lesson is prevention: connect automated backup now, while everything is fine. We cover how in our guide to backing up QuickBooks Online automatically.
Restoring a QuickBooks Desktop Backup
Since Rebuild Error 310 is a Desktop problem, it is worth noting the Desktop restore path too. Go to File → Open or Restore Company → Restore a backup copy → Local backup, choose your .QBB file, and restore it to a new company file — do not overwrite the damaged file until you have confirmed the restored copy opens cleanly and verifies without errors. If your only backup is the one 310 blocked, Auto Data Recovery is your fallback.
A Note for Australian Users
If you are in Australia, you are far more likely to be on QuickBooks Online than Desktop. Intuit no longer sells QuickBooks Desktop here; the desktop lineage many Australian businesses still run is Reckon Accounts, which descends from the same codebase and has near-identical verify-and-rebuild tools, so these steps translate closely. Whichever you use, keeping a real backup is not just insurance against errors like 310 — the ATO expects you to retain business records for five years, and a corrupted file with no backup puts that at risk.
Getting Help
Data damage is stressful precisely because it hits the records you rely on most, and the decision of when to keep rebuilding versus when to restore is easier with someone who has made it before. If you would like help repairing a damaged QuickBooks file, recovering data after a failed rebuild, or — better still — setting up automated backups so a future error 310 is a shrug rather than a crisis, our Small Business IT Support service can step in. Get the backup right once, and your accounting file stops being a single point of failure.